BLOWER-POWERED PERSONNEL CLEANING STATION
INSTALLATION | OPERATION | MAINTENANCE
1
CONTENTS PAGE
3
CLEANING STATION SAFETY INFORMATION
5
INSTALLATION (ELECTRICAL)
7
MAINTENANCE & SERVICE
9
WARRANTY COVER
11
USEFUL REFERENCE
2
GENERAL SAFETY INFORMATION
4
YOUR NEW UNIT
6
INSTALLATION (RAIN COVER)
8
MOTOR BRUSH REPLACEMENT
10
WARRANTY COVER
12
REGULATIONS & RECYCLING
Please read the following installation, operation and maintenance instructions carefully. Always ensure that the power is isolated before commencing any maintenance on the Cleaning Station. This manual is also available from the marked download section of our website: www.jetblacksafety.com
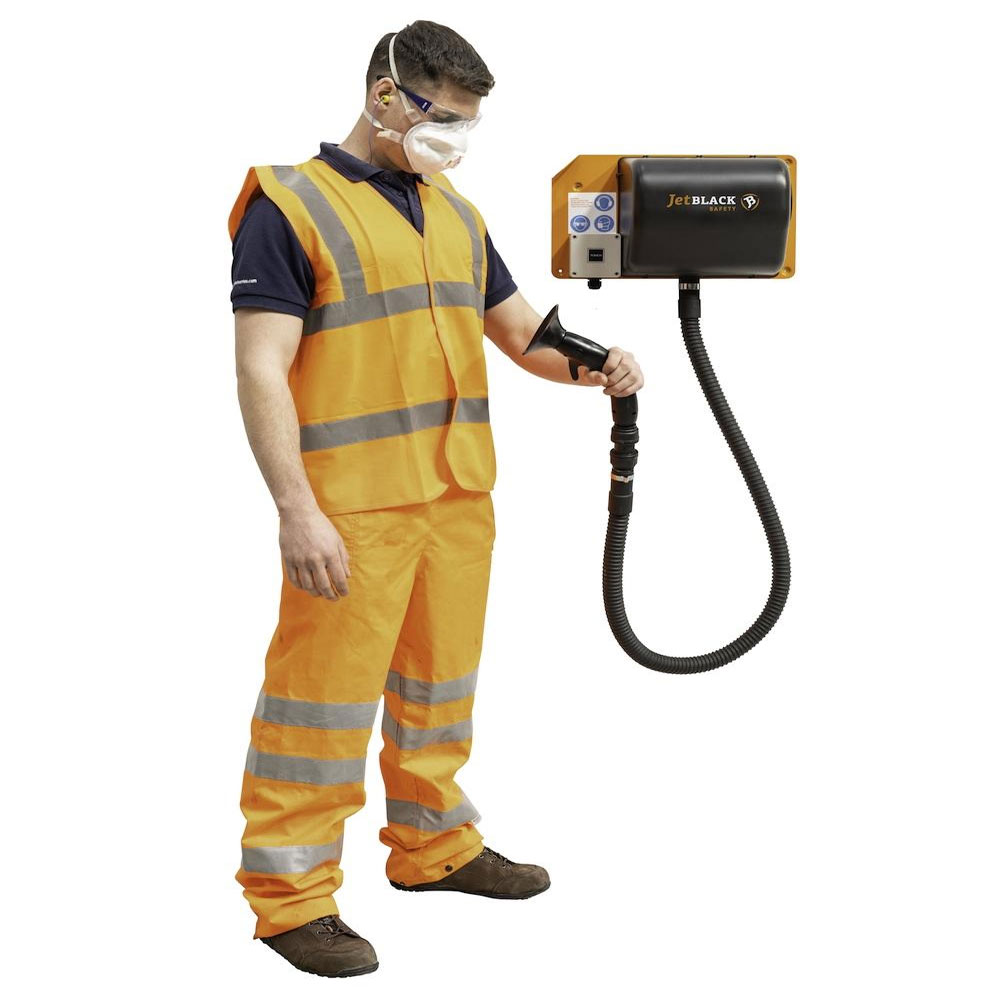
WARNING: The JetBlack Safety Cleaning Station has been designed as an effective dedusting tool which removes debris and contaminants from clothing and personal protective equipment (PPE) using high volume low pressure air as a safer alternative to compressed air.
Please note that the removal of debris and contaminants will produce airborne dust. This dust could be hazardous and present an inhalation risk to the user. Exposure to hazardous dust should be adequately controlled in line with the Control of Substances Hazardous to Health Regulations 2002 (COSHH). We recommend that users implement suitable and adequate engineering controls for the airborne dust released such as extraction and the use of a down flow booth, respiratory protective equipment (RPE) and PPE. Users must wear appropriate eye, ear and respiratory protection at all times whilst operating the JetBlack Safety Cleaning Station.
The JetBlack Safety Cleaning Station is compliant with the Occupational Safety and Health Act of 1970 (OSHA) when used in conjunction with the OSHA compliant chip guard which is available to customers.
JetBlack Safety also offers a local exhaust ventilation (LEV) compliant Personnel Cleaning Booth that extracts and collects dust in a high efficiency particulate air (HEPA) H14 filtered unit.
General Safety & Operation
• Attach the ‘OSHA’ guard provided to the main nozzle assembly before
operating. This can be easily done by simply sliding the guard onto the end of the nozzle
• Never use in a wet environment
• Never allow objects to pass through the inlet filter whilst the fan is rotating
• Always switch off the unit at the main electrical supply and disconnect the plug before performing any cleaning or maintenance operations on the Cleaning Station
• Never use a pressure washer or steam washer to clean the Cleaning Station
• Eye, ear and respiration protection must always be worn whilst operating
• The Cleaning Station has a thermal shut-off device for safety purposes. Prolonged use may cause the unit to shut-off. In this case, switch the unit off and wait for a few minutes before re-using
• Please note – the air from the Cleaning Station will become warm with prolonged use
• These units are not designed for continuous use
• The Cleaning Station is suitable for safe
area installation only and must not be used in ATEX zones or near the presence of explosive substances
Wall Mounted Units
Electrical Safety
• This equipment is designed to be hard wired to a fused supply. Check that the correct wire gauge is used and that the correct voltage is available before
connection. Refer to the Cleaning Station rating plate for full details – this is located on the side of the Touch Switch Box
• The Cleaning Station can be fitted with a speed controller, which allows for the speed to be changed
• Any attempt to change the timer switch settings will invalidate the warranty
• The Cleaning Station should be connected to an electrical supply that is surge protected and in compliance with local codes
• The appliance must be earthed
• Always shut off the supply power and isolate the Cleaning Station before performing any maintenance operations
General Safety
• The Cleaning Station is supplied with a touch activated time switch, mounted in a weatherproof enclosure sealed to an IP55 rating
• To operate, press the ‘Touch’ button. The Cleaning Station will run for 30 seconds – if you require less time, simply press the ‘Touch’ button again, and the unit will turn off
• If an anti-static unit has been fitted, a second switch is located on the front of the Cleaning Station – the switch must be on ‘I’ for the anti-static pack to work correctly
Portable Units
• The On/Off switch is located behind the carrying handle on the main body. Press ‘I’ to turn the unit On, and ‘O’ to turn off
• If an anti-static unit has been fitted, a second switch is located on the front of the unit – the switch must be on ‘I’ for the anti-static pack to work correctly
• Always ensure that the portable Cleaning Station stands level on the four plastic feet provided
• The Cleaning Station can be fitted with a speed controller, which allows for the speed to be changed
Wall-Mounted Unit Features Portable Unit Features
Equipment Arrival & Inspection
If there are any shortages, discrepancies or damage to your product upon delivery of your Cleaning Station, please immediately contact the Distributor that you purchased it from.
Nozzle Assembly Detachment
• Rotate the black coloured quick release fitting 90 degrees until it clicks
• Push the upper ring towards the hose (away from the nozzle), pull and twist until it detaches
• Rotate the black quick release fitting 90 degrees, and back to its original position
• Push the replacement nozzle into the connector
• Installation, commissioning and electrical installation should only be performed by a trained service person and in accordance with the latest IEE regulations
• Find a suitable location for the Cleaning Station, ensuring the surface can support the total weight including the cover
• All nominated installers will be responsible for proper and safe installation, as well as for
safe operation
• The JetBlack main unit has an IP rating of IP42, with
an on/off switch rated at IP55
PLEASE NOTE: The hose and gun assembly may arrive detached. If this is the case, simply remove the attached bung from the discharge spigot. Slide the hose clip over the hose cuff, push the hose cuff onto the spigot and tighten the hose clip firmly.
Wiring Diagram
Rating
Please refer to the Cleaning Station rating plate for full details. On wall mounted units, these are located on the side of the ‘On/Off’ Touch switch. For portable versions, they are located next to the power cable entry.
• Locate fixings suitable for the substrate you are mounting to and secure the Cleaning Station using the four holes in the baseplate. Ensure the four spacers supplied are fitted under the baseplate when fitting to the wall
• If the Cleaning Station is already fitted to the wall, remove and fit spacers supplied under the baseplate, trapping against the wall upon re-tightening the fixings
• Unhook the Cleaning Station gun from the
holder on the backplate
• Lift cover over the Cleaning Station and locate the slots on the rear face over the spacers fitted underneath
• It may be necessary to reroute any cable that potentially fouls on the cover prior to fixing the cover down
• Secure the cover to the wall with suitable fixings using the two ø7.0mm holes in the sides
• Hook the gun onto holder on the cover
The following points must be observed when performing any maintenance or service operations to the Cleaning Station:
• Filters – we recommend that the filter is inspected at least once a month, and replaced after a maximum of 3 months. The internal part number for this filter is 0-1257/10/PAPER
• The power supply must be disconnected and secured against restoration
• Observe personal safety regulations
Changing Wall-Mounted Filters
• Remove the M5 screw / filter guard as shown on the image below,
and pull the filter out of its locating hole
• Re-insert a new filter, refit filter guard
Changing Portable Unit Filters
• Remove the 4 fixing screws / filter guard as shown on the image below, and pull out the plug filter
• Re-insert new plug filter, and secure guard and screw
• Ensure that the power supply is turned off, and that the Cleaning Station is electrically isolated and locked off
• Remove all screws retaining the main Cleaning Station outer cover, and lift cover off (see right)
• Unscrew 2 screws from the plastic motor cover, and remove cover (see below)
• There are two plastic brush holders to be removed. Unscrew 2 self-tap screws per brush set
• Remove the female receptacle motor lead from the old brushes
• Refit new brushes. Assembly is the opposite of removal
JetBlack Safety is a trading name of Air Control Industries Ltd (ACI). Subject to the restrictions mentioned below, your equipment Warranty covers the repair or
replacement, free of charge, of parts acknowledged to be faulty by Air Control Industries Ltd (ACI), as well as the labour necessary to repair the equipment for twelve months from the date of shipment.
Please Note
• The Warranty is dependent upon the manufacturers recommended
maintenance and servicing being carried out at the time intervals specified in this Manual. It may be necessary to provide proof of this (maintenance records, invoices etc)
• The motor within the unit has a working life of 500 hours and the brushes may need replacing after this period. This is considered to be normal wear associated with the use of the motor and therefore not covered under the Warranty. Spares can be purchased from ACI
• Work carried out under the Warranty does not extend the Warranty. In particular,
the replacement of a part during work carried out under Warranty does not extend the lifespan of the part. The Warranty which covers the replacement part expires on the date of expiry of your equipment’s Warranty
• Parts replaced under the Warranty become the property of ACI
• At no time will ACI be liable for any of the costs to the buyer for labour,
transportation or down-time resulting from defective equipment furnished by ACI or our suppliers
The Warranty Does Not Cover
• Maintenance and servicing operations necessary for the correct operation
of the equipment, mentioned in the Maintenance sections of this document.
• If the defect was due to accident or misuse, operation in an application not approved by ACI or an unauthorised modification or repair
• Consumable parts and their routine replacement, such as filters etc
• The replacement of parts that are subject to normal wear associated with use of the equipment, if this replacement is not the consequence of a fault.
• Damage caused by natural phenomena, hail, flooding, storms or other atmospheric hazards, as well as damage caused by accidents, fire or theft
Our products are manufactured in compliance with applicable international standards and regulations. If you have any queries regarding the use of our products, or if you are planning a special application, please contact ACI:
Cleaning Station Spare Parts List
JBA-015 Moulded Cleaning Station with full OSHA nozzle assembly (includes dip-moulded nozzle)
JS-009/1500 Flexible hose assembly for wall-mounted Cleaning Station – 1.5m/56” in length
0-1257/10/PAPER Replacement paper filter element
8-006/115 110V replacement motor
Trouble Shooting
Malfunction Possible Cause Remedy
Low Airflow Dirty or contaminated blower filter This item MUST be changed regularly. We recommend the filter is changed every 3 months subject to operating conditions.
Damaged hose Replace damaged hose
Blockage in air ducting Check all ducting and air delivery devices for blockages
Leak in air delivery ducting
Check and replace damaged hose and clips
Irregular / Excessive Noise Noisy motor Replace motor
No power available Check the supply and switch, and replace as necessary
Anti-Static not working (portable) Anti-static control box is off Switch anti-static control box to on position
Fuse has blownReplace fuse (0.75A anti-surge)
Unit fails to operate Burnt out motor brushes Replace brushes
No power to unit Check power supply is live including all fuses/MCBs
Motor has failed Replace motor
Regulations
The JetBlack Safety Cleaning Station is designed in accordance with the following directives:
Conforms to OSHA Standard 29 CFR 1910.242 (b)
EN 55014-2 EMC Directive (Immunity)
EN 61000-3-2 EMC – Limits for harmonic current emissions
WEEE Recycling & Materials Disposal
Products bearing this WEEE symbol should not be disposed of in general waste. These should be taken to local facilities where they can be recycled free of charge.
This will ensure minimum impact on the environment and human health which could otherwise arise from inappropriate waste handling.
This product has been designed with environmental disposal in mind, all materials are fit for purpose, robust, yet easy to recycle. The back plate is painted mild steel, the main body is molded ABS, the air gun is a polycarbonate/ABS mix & all wiring is PVC insulated copper.






Reviews
There are no reviews yet.